My ultimate goal was to be able to route an email massage through the International Space Station, which has an APRS digipeater operating on 145.825 MHz. Unfortunately, the week before I completed this project, the APRS digipeater on the Space Station was replaced by a cross-band repeater. Still, it's fun to experiment with this technology.
Let's start the hardware I made. If you you just want to decode messages, all you need is to install the software and place your radio in front of the PC's microphone. But if you are going to be using APRS for any length of time, you'll want to have a wired connection, otherwise the constant "bzzzt, bzzzt, bzzt" will drive you crazy.
I sketched out a little circuit on engineering paper. Somehow I enjoy this more than using CAD tools. I designed this interface board to work with Baofeng radios. To receive APRS signals, you can just wire, straight through from the radio's speaker jack to the PC's line-in connector. The transmitted APRS signals need to be attenuated to match the radio's low-level microphone input levels. Some resistors and a trimmer potentiometer are used for that. I put a capacitor in the microphone lead just in case there was a DC bias voltage there for any connected mic. The way the push-to-talk signal works on Baofeng radios is that when the microphone connector is shorted to ground, the transmitter is activated. An audio isolation transformer is used to isolate the microphone connector from ground so the radio only transmits when I want it to transmit. Transmit mode is triggered by the software on the PC by toggling a line on an RS-232 serial port. Most PCs don't have this anymore, so I had to use a USB to serial adapter, and run the DTR line to an opto-coupler which shorts the microphone connector to ground, causing the radio to start transmitting.
I built the project on perf-board with vector clips and put it in a small project box. As I've encountered in previous projects, the backshells of standard audio plugs don't clear the Baofeng case, so you should either remove them or unscrew them a few turns before plugging them into the radio. I got these cool connectors with springy metal strain reliefs from Adafruit. However the first time I set the radio down, the strain reliefs touched each other and the radio started transmitting! Good thing I had a dummy load in place of an antenna! In the photo you can see that I've removed one of the backshells.
Now I need to set the transmit level. To do this, I installed the Pulse Audio Volume Control and used Audacity's tone generate function to play a tone through the system. I then adjusted the final output level to about 2.5 mV peak.
Now that the hardware's ready, here's the software. For the Xubuntu 18.04 system I'm working with, the two applications I needed were Direwolf and Xaster. Both of these can be installed with "sudo apt-get install". Direwolf is a software modem, or in ham radio talk, a TNC or Terminal Node Controller. Xastir is an APRS client. The APRS the client talks and listents through the modem to the radio.
On Linux you will have to configure a couple of things before you can use the apps without running them as root. Do not be tempted to run any application as root. Instead run the following from the command line:
$ usermod -a -G dialout $USER
$ usermod -a -G xastir-x25 $USER
Next, in my home directory, I needed to create direwolf.conf with the following line:
PTT /dev/ttyUSB0 -DTR
This line activates "Push To Talk" when DTR is low. I had to add the "-" sign because it was simpler to do the opto-coupler with negative logic.
Next the receive levels needed to be set so Direwolf can decode signals reliably. To set levels, I again used the Pulse Audio Volume Control. Select Direwolf as the recording source, then adjust the level so that with each digital squawk of the radio you see incoming messages on the direwolf console at an audio level of about 50.
Now it's time to configure XASTER. First, a map to display received stations on is needed. OSM_tiled_mapnic.geo seems to work well.
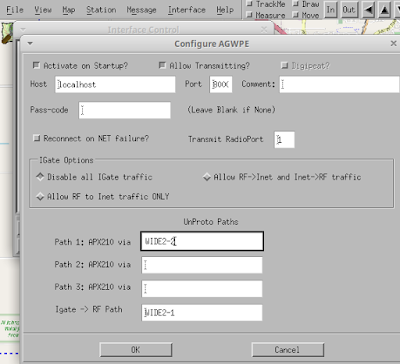
Now XASTER needs to know how to get the packets received by direwolf. The packets are served up over the internal network via AGWPE on port 8000. Select Interface, Add, and click Networked AGWPE.
Check the confirm the configuration and then click OK. AGWPE will then appear on the interface list.
On the interface list, highlight Networked AGWPE and click Start. Weather stations, trucks, 4WD vehicles on the Rubicon Trail, and even ships should start appearing on the map.
Now it's time to transmit a packet and see if our station appears on the map.
Click Message, General Stations Query. The radio should switch to transmit mode, send a packet, and then switch back to receive mode. However, the first time I tried this, the radio was sitting right next to the interface box, and the energy from the radio jammed the PTT circuit into the transmit mode, and it wouldn't shut off! I quickly yanked the connectors out of the radio! The next time I tried it, I connected the radio through a long cable to an antenna outside the shack.
There is a website that logs all APRS packets: http://aprs.fi. I searched for my station and there it was!
How did my packet get to aprs.fi? If I hover over my station, I see that a digipeater on Banner Mountain near Nevada City (about 35 miles away) relayed it all the way back to an iGate in San Francisco. It's kind of a long round-about trip, but it worked!
Next step: actually sending an email.


