This project saves pictures from various cameras in its pouch! The possum uses a web browser as a control panel. Since we'll be using this when travelling, it's designed to work well with Safari running on iPhone or iPodTouch. Hardware consists of a Raspberry Pi, an external hard drive, and an Edimax Wi-Fi dongle. You'll need a USB hub and a 5V power supply for both the Pi and the external hard drive.
To use the Possum, connect a camera to the hub, web into the Possum, and start backing up your pictures!
This entry describes setting up the Pi operating system and networking.
Step one was to get the pi image onto the sd card. We had started this project and made lots of progress, so I tried to clone - with no success - the image from one 4GB card to another using "dd". Every thing I tried - various block sizes of bs=4GB to bs=4GB. Every time I tried, "out-file" ran out of room.
I gave up and downloaded a fresh Raspbian image, and used Win32DiskImager to download the image (I was getting tired of "dd"). Interestingly the ras-pi web page uses a SHA-1 has to verify the integrity of the image, and Win32DiskImager only calculates MD5. That's OK. I'm living dangerously.
Since this Pi had already been on my network I knew the IP address. Time to connect.
ssh 192.168.0.204 -l pi
And I get this.
@@@@@@@@@@@@@@@@@@@@@@@@@@@@@@@@@@@@@@@@@@@@@@@@@@@@@@@@@@@
@ WARNING: REMOTE HOST IDENTIFICATION HAS CHANGED! @
@@@@@@@@@@@@@@@@@@@@@@@@@@@@@@@@@@@@@@@@@@@@@@@@@@@@@@@@@@@
IT IS POSSIBLE THAT SOMEONE IS DOING SOMETHING NASTY!
Someone could be eavesdropping on you right now (man-in-the-middle attack)!
It is also possible that a host key has just been changed.
The fingerprint for the ECDSA key sent by the remote host is
f9:4f:ab:1a:0d:cd:42:0a:7d:f7:95:5c:48:77:69:13.
Please contact your system administrator.
Add correct host key in /home/tester/.ssh/known_hosts to get rid of this message.
Offending ECDSA key in /home/tester/.ssh/known_hosts:1
remove with: ssh-keygen -f "/home/tester/.ssh/known_hosts" -R 192.168.0.204
ECDSA host key for 192.168.0.204 has changed and you have requested strict checking.
Host key verification failed.
That's because I've had one NIC with different disk image. I ran
ssh-keygen -f "/home/tester/.ssh/known_hosts" -R 192.168.0.204
And I'll use the combine the .old file to so I can run this board with either disk image.
Now log in as "pi" again, and use the password "raspberry".
Run the setup. Configure the device not to start the desktop automatically.
sudo raspi-config
Then configure the network by editing the interfaces file.
pi@raspberrypi /etc/network $ cat interfaces
auto lo
iface lo inet loopback
iface eth0 inet dhcp
auto wlan0
allow-hotplug wlan0
iface wlan0 inet dhcp
wpa-scan-ssid 1
wpa-ap-scan 1
wpa-key-mgmt WPA-PSK
wpa-proto RSN WPA
wpa-pairwise CCMP TKIP
wpa-group CCMP TKIP
wpa-ssid "mynetwork"
wpa-psk "mywpa2passphrase"
iface default inet dhcp
Starting out in infrastructure mode is handy, but the goal is to have an adhoc network so we can connect anywhere. Here's the configuration for that.
pi@raspberrypi /etc/network $ cat interfaces
auto lo
iface lo inet loopback
iface eth0 inet dhcp
allow-hotplug wlan0
iface wlan0 inet static
address 169.254.1.1
netmask 255.255.0.0
wireless-channel 6
wireless-essid mynetwork
wireless-mode ad-hoc
wireless-key 4142434445464748494a4b4c4d
There are a couple of interesting things here. First I've manually configured an auto-IP address or 169.254.1.1 which is not normally done. Since this is an ad-hoc network with no DHCP server, devices that join are supposed to auto-IP; that is, will assign themselves a random address after checking that the address isn't already taken. However, in this case, we have to know where to point our browser, so I've statically assigned it to 169.254.1.1 so we can always find it. At some point I'll look into Link Local Multicast Name Resolution (LLMNR).
The other interesting thing is the wireless key. It's a needs to be a string of 26 hexadecimal digits. When connecting to the network you don't enter these hex digits, but rather the ASCII equivalent. It this case, the key is a 13 character string: "ABCDEFGHIJKLM".

"To invent, you need a good imagination and a pile of junk." -Thomas A. Edison
Thursday, May 8, 2014
Sunday, May 4, 2014
Getting Google Maps Markers onto a Garmin eTrex GPS
To get a Google Maps marker or two onto an eTrex GPS, you can use the Garmin Communicator plug-in if you can run Internet Explorer. However, it's tedious to use when you have a large number of markers. And, what about those of us on Linux? GPSPrune did the trick for me. I was able to get GPSPrune from the Ubuntu repository using apt-get.
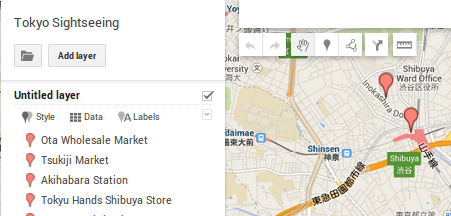
After you've created a map in Google Maps, the next step in the marker transfer process is to get the markers onto your local drive in a format recognized by GPSPrune. Click the folder icon in the upper left hand corner of your map and select "Export to KML".
Plug your GPS into the USB port and power it up. Next is a critical step that took me a while to figure out. The GPSPrune application needs access to the USB port. You could bring up a terminal and type "sudo GPSPrune" to run as super user; but don't do that. Here's the right way. Most of the info on how get GPSPrune talking to the Garmin came from this page: http://wiki.openstreetmap.org/wiki/USB_Garmin_on_GNU/Linux
First, from the console, add your user to the lp group.
sudo adduser <my_user> lp
Next type:
lsusb -v | more
This will get you information on your GPS:
Bus 005 Device 004: ID 091e:0003 Garmin International GPS (various models)
Now create and edit a USB permissions rules file.
sudo nano /etc/udev/rules.d/51-garmin.rules
And then input and save the following vendor and product IDs along with the new access mode.
ATTRS{idVendor}=="091e", ATTRS{idProduct}=="0003", MODE="666"
To activate the changes run:
sudo udevadm control --reload-rules
From GPSPrune, click File, Open File, and select your KML file. All your markers should appear. Now click File, Send Data to GPS. Uncheck "Send Tracks", then click OK.
The markers should appear on your GPS as waypoints. Here's the amazing thing about it. The marker field in Google Maps is much longer that the eTrex waypoints string. Either GPSPrune or GPSBabel (which does some of the behind-the-scenes work) abbreviates everything intelligently. For example, "Center" becomes "CNTR". I didn't need to shorten any strings beforehand.
Once I figured it out, it was a pretty easy and quick process.
After you've created a map in Google Maps, the next step in the marker transfer process is to get the markers onto your local drive in a format recognized by GPSPrune. Click the folder icon in the upper left hand corner of your map and select "Export to KML".
Plug your GPS into the USB port and power it up. Next is a critical step that took me a while to figure out. The GPSPrune application needs access to the USB port. You could bring up a terminal and type "sudo GPSPrune" to run as super user; but don't do that. Here's the right way. Most of the info on how get GPSPrune talking to the Garmin came from this page: http://wiki.openstreetmap.org/wiki/USB_Garmin_on_GNU/Linux
First, from the console, add your user to the lp group.
sudo adduser <my_user> lp
Next type:
lsusb -v | more
This will get you information on your GPS:
Bus 005 Device 004: ID 091e:0003 Garmin International GPS (various models)
Now create and edit a USB permissions rules file.
sudo nano /etc/udev/rules.d/51-garmin.rules
And then input and save the following vendor and product IDs along with the new access mode.
ATTRS{idVendor}=="091e", ATTRS{idProduct}=="0003", MODE="666"
To activate the changes run:
sudo udevadm control --reload-rules
The markers should appear on your GPS as waypoints. Here's the amazing thing about it. The marker field in Google Maps is much longer that the eTrex waypoints string. Either GPSPrune or GPSBabel (which does some of the behind-the-scenes work) abbreviates everything intelligently. For example, "Center" becomes "CNTR". I didn't need to shorten any strings beforehand.
Once I figured it out, it was a pretty easy and quick process.
Subscribe to:
Posts (Atom)