I have some audio files that I need to transcribe. I figured it would be
easy just to load them up in the Audacity audio editor and type away.
Not so easy. People talk much faster than I can type, and it's hard to
control Audacity while trying to type on the word processor.
Fortunately, Audacity has
keyboard short-cuts. I just need a way to connect a foot pedal to Audacity.
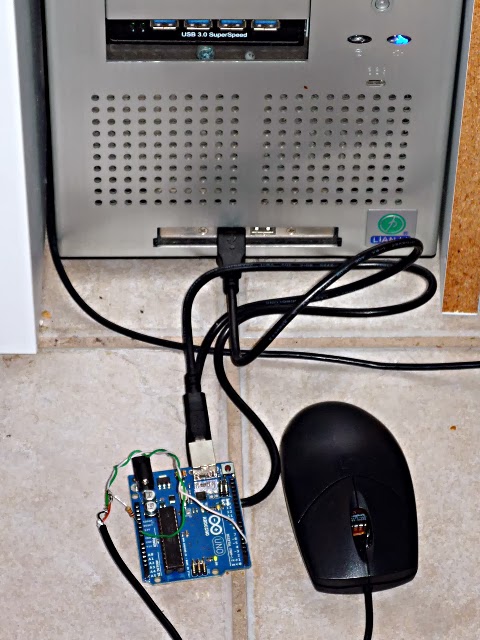
An old PS2 mouse makes a decent foot pedal. I gutted the unit, removing
the scroll wheel, and then wired the mouse buttons to the I/O cable.
I then cut off the PS2 connector, and wired it to pin 2 of an Arduino. I
also added a 10K pull-up resistor. Here's what it looks like assembled
and connected.
The Arduino was programmed to send the following text strings:
15 seconds after boot: "g"
mouse down: "0"
mouse up: "1"
Here's the code (adapted from Arduino Playground):
// digital pin 2 has a pushbutton attached to it.
int pushButton = 2;
// the setup routine runs once when you press reset:
void setup() {
// initialize serial communication at 9600 bits per second:
Serial.begin(9600);
// make the pushbutton's pin an input:
pinMode(pushButton, INPUT);
delay(15000);
}
void loop() {
Serial.println("g");
int initButtonState=digitalRead(pushButton);
//loop forever
while(1)
{
// read the input pin:
int buttonState = digitalRead(pushButton);
if(initButtonState != buttonState)
{
// print out the state of the button:
Serial.println(buttonState);
//debounce
delay(5);
}
initButtonState=buttonState;
}
}
I decided to code this in Python because it's a pretty fun and easy
language with lots of libraries. But, the first thing I needed was
X-windows automation and there seem to be a lot of choices. Even though
it's been replaced by Xaut, I found Xautomation worked for me. I got
Python and Xautomation from the Linux Mint Software Library, but I could
have got them as easily using apt-get.
For each of the received characters I used Xautomation to sent the following key strokes.
g = space p (start playback and pause)
0 = p (un-pause)
1 = comma comma comma comma comma p (back up a little, then pause)
The last link was the serial link connecting the Arduino to the Python
code. pySerial looked like a good library, and to get it I would need
python-pip.
sudo apt-get install python-pippip pySerial
pySerial didn't work at first. I found I had to execute the following commands.
sudo usermod -a -G dialout tester
sudo chmod 777 /dev/ttyACM0
The first command gives you permission to access serial I/O. The second
gives you permission to use the particular USB device. Unless you have
put these settings in a bash script, you'll have to execute them every
time you run the program. Also, depending on your hardware, your USB
device may have a different name (like ttyUSB0). The short-cut way to
getting pySerial working would be to run Python as root, which is a very
bad idea, however.
Here's the code with all in all its ugliness:
# serial_read_keys.py
import time
import serial
from subprocess import Popen, PIPE
control_f4_sequence = '''keydown Control_L
key F4
keyup Control_L
'''
shift_a_sequence = '''keydown Shift_L
key A
keyup Shift_L
'''
initialize_sequence = '''key space
key P
'''
play_sequence = '''key space
'''
unpause_sequence = '''key P
'''
pause_sequence = '''key P
'''
backup_sequence = '''key comma
'''
def keypress(sequence):
p = Popen(['xte'], stdin=PIPE)
p.communicate(input=sequence)
ser = serial.Serial('/dev/ttyACM0',9600)
while (1) :
#print 'reading line'
rcvChar = ser.readline()
# print rcvChar
if 'g' in rcvChar :
print 'initialize - play and pause'
keypress(play_sequence)
time.sleep(0.1)
keypress(pause_sequence)
if '0' in rcvChar :
print 'unpause'
keypress(unpause_sequence)
if '1' in rcvChar :
print 'backup a little then pause'
keypress(backup_sequence)
time.sleep(0.1)
keypress(backup_sequence)
time.sleep(0.1)
keypress(backup_sequence)
time.sleep(0.1)
keypress(backup_sequence)
time.sleep(0.1)
keypress(backup_sequence)
time.sleep(0.1)
keypress(pause_sequence)
I had to do some experimentation, and I left all of that in there so I could document what I had learned.
To do transcription, first open your audio file with Audacity. You may
want to use the Effect, Change Tempo menu item to slow down the
play-back. Now start the Python script. You have 15 seconds to do the
following: make sure the Audacity stop button is clicked, then click on
the waveform you want to transcribe.
After 15 seconds, the script will click the play button then immediately
click pause. Don't touch anything on your screen again. If you do, it
will lose focus and the key-presses won't go to Audacity. So, how are
you supposed to type the transcription then? Use another computer! I
neglected to tell you that, didn't I?
Go to the other computer, mash down on the mouse with you foot and the
audio will begin to play. Release the mouse and the audio will back up
about 5 seconds and then pause. Why does it back up before pausing? So
you can more easily sync up your typing. If you want to back up more
double click the mouse.
One unexpected nice feature I found is that when you start the script,
it reboots the Arduino, so you don't have to reach down and press the
reset button.