Saturday, August 15, 2020

CHIRP for Baofeng Radios

Programming these things from the front panel is extremely tedious. And, if you're using the front panel, you can't get the alphabetic characters you need to display repeater call signs. There is an application to program your radio called CHIRP. With CHIRP, you can pull in lists of repeaters from the RepeaterBook web site, and then edit and organize them in a spreadsheet-like user interface. If you are using any of the Ubuntu flavors of Linux, you can just install CHIRP from an Ubuntu repository.

The radios don't come with a programming cable, but it's pretty easy to make one. The cable is based on an article by Miklor. I used a CP2102 breakout board that I got on Amazon and some really slick metal stereo phone plugs fom Adafruit. You'll need a 3.5 mm and a 2.5 mm plug.

The thing I like about the markings on this breakout board is that they leave no ambiguity: 

    RXI (Receive In) is a "gozinta"
    TXO (Transmit Out) is a "gozouta"


It turns out that the phone plugs don't clear the radio's body so even though they look like they're fully seated, in fact they are not. I had to unscrew the backshells a few turns to get them to make contact. I found another disadvantage of metal backshells: if you touch the springy strain reliefs together, the radio goes into transmit mode! Next time I'll use plastic backshells.


Connect the plugs to the CP2101 like this:
Now you can start editing your CHIRP spreadsheet. Use "Input from data source" to populate the spreadsheet with repeaters. You can also enter stations like your local NOAA weather channels. Here's another thing you can't do from the front panel. Change the station's entry in the "duplex" column from "(None)" to "Off". This disables the transmit function on that channel, so you don't accidentally key up on it. You may also want to set the value in the "Skip" column to "S", so scanning never stops on the weather channel.

When you program the radio, it's best to turn the volume up to get maximum signal into the PL2101 breakout. Also, when you are downloading from or uploading to the radio, although there's a warning about this, and the status LED flickers, but it doesn't really appear to go into transmit mode. All the same, it may be a good idea to go to an unused channel, and set the power to low, or to use a dummy load.

When CHIRP asks you for a port, you will see something like "/dev/ttyS1" at the top of the drop-down list. Scroll down to the very bottom to find your USB port, which is going to look something like "/dev/ttyUSB1".

When you're using CHIRP, you can expect to see the radio's status LED do the following:

Read:  Flickering Green/Amber
Write: Flickering Green

Now there's one more thing to be done: change the display to show the repeater call signs you entered in CHIRP. Go into the radio's menu from the front panel and set MDF-A to "name". I've left the B channel on "freq" so I still have the option of selecting channels by frequency.


As a bonus, here's one more cheap radio programming trick. The QYT KT-8900R has a library file that may not yet be included in the version of CHIRP that you installed. You can get it here: https://chirp.danplanet.com/issues/6265, but there's a typo in the code, so you will have to search for the string "radio.id2" and change it to "radio._id2".


Saturday, July 4, 2020

Garden Logger

How many hours of sun does each raised bed in the garden get? How moist is the soil? How fast does it dry out, and how does that correlate with the air temperature?  And, how does all of that correlate with the productivity of a given crop type?

The first step towards finding those answers is to collect data. I'm starting simply with just measuring the hours of full sun and logging it to an SD card once per minute. The circuit consists of a CdS photocell in a  half bridge configuration connected to one of an Arduino's analog inputs. The resistance of the photocell is calculated in the Arduino sketch which was probably isn't a great idea, since it's going to need to be post-processed anyway. I have yet to figure out how to calibrate the photocell so that the results can be displayed in units of luminous intensity, but, regardless I should have just logged the output in raw A to D bits.

The date and time of day is stored in a Real Time Clock (RTC), which is part of the logger that I got from Amazon. The RTC had to be programmed once before loading the logger sketch.

Arduino sketch reads the resistance of the photocell and the time and date on the clock, and stores it to the SD card. After sitting all day in the sun, covered by a piece of cardboard (except for the photocell), I bring the card in and add a description of the logged location to the last line of the file, using a tag "Title:".


The log file looks like this:

2020/06/23T20:10:14, 395.9
2020/06/23T20:11:14, 406.5
2020/06/23T20:12:14, 417.1
2020/06/23T20:13:14, 449.0
2020/06/23T20:14:14, 449.0
2020/06/23T20:15:14, 470.3
Title: Bed 2

To get plots of the solar intensity, I wrote a Python script that uses matplotlib. The brighter the sun, the lower the resistance. Full sun is about 25 ohms. As each location is plotted, the number of hours of full sun is calculated. Full sun is assumed to be when the resistance is less that 75 ohms. The number of full sun hours is often less than the stop time minus the start time. This is because the trees or other objects sometimes obscure the sun over the course of the day.


For each plot I mark the total hours of sun on a diagram of our garden.


This is the hardware:
  • Arduino Uno
  • HiLetGo data logger shield
  • CdS photocell
  • 10 Kohm Resistor

This is the software:


I have some soil moisture and temperature sensors that I'll integrate into the next phase of the project.


Saturday, February 15, 2020

Lemonade!

We had a great harvest of Eureka lemons, plus a few Meyer lemons that we had grafted on to the tree.


Lemonade is great, right? Here's the recipe I used. It's not too sweet, and it doesn't require too much measuring.

Ingredients
1.5 cups lemon juice
1.5 cups sugar

Start with a two quart pitcher.
Add the sugar first.  # This way you can reuse the measuring cup.
Add the lemon juice.
Fill the pitcher with cold water.
Refrigerate.

Aren't recipes a little like a programming language? Ingredients are declared, then steps are executed. You can even have comments or loops like "check every five minutes until done".

I just hope I don't find a bug in my recipe!


Saturday, January 18, 2020

First Pass at a Backyard Loaded Dipole

40 meters is a great amateur band because it's open all night. That is, it's not like the 20 meter band that stops skipping radio signals around the globe as soon as the sun goes down. Unfortunately a 40 meter dipole is 20 meters long end-to end and my backyard can only fit about 15 meters if it's run diagonally. The trick is to add load coils about 1/3 of the way from the end to lower the resonant frequency of the shortened elements.


It looks something like this in the XNEC2 simulator:


The yellow boxes represent the loads. The red box is the location of the balun that connects the antenna to the feed line. In simulation, the trick is to alternately shorten the elements then increase the inductance of the loads to prevent the resonant frequency of the antenna from rising. Resonance is identified by the frequency at which VSWR is at a minimum.

Here's the NEC2 card stack I finally arrived at:


CM --- NEC2 Input File created or edited by xnec2c 3.6.1-beta ---
CM 40 meter loaded dipole
CM (null)
CE --- End Comments ---
GW     1    15  -6.00000E+00  0.00000E+00  7.62000E+00  6.00000E+00  0.00000E+00  7.62000E+00  1.50000E-03
GE     0     0   0.00000E+00  0.00000E+00  0.00000E+00  0.00000E+00  0.00000E+00  0.00000E+00  0.00000E+00
EX     0     1     8      0  1.00000E+00  0.00000E+00  0.00000E+00  0.00000E+00  0.00000E+00  0.00000E+00
FR     0   201     0      0  6.00000E+00  1.00000E-02  0.00000E+00  0.00000E+00  0.00000E+00  0.00000E+00
NH     0     0     0      0  0.00000E+00  0.00000E+00  0.00000E+00  0.00000E+00  0.00000E+00  0.00000E+00
NE     0    10     1     10 -1.35000E+00  0.00000E+00 -1.35000E+00  3.00000E-01  0.00000E+00  3.00000E-01
LD     0     1     3      3  1.00000E+00  2.45000E-05  1.00000E-06  0.00000E+00  0.00000E+00  0.00000E+00
LD     0     1    13     13  1.00000E+00  2.45000E-05  1.00000E-06  0.00000E+00  0.00000E+00  0.00000E+00
RP     0    19    37   1000  0.00000E+00  0.00000E+00  1.00000E+01  1.00000E+01  0.00000E+00  0.00000E+00
EN     0     0     0      0  0.00000E+00  0.00000E+00  0.00000E+00  0.00000E+00  0.00000E+00  0.00000E+00

After fiddling with the GW and LD cards I came up with a loaded dipole optimized for 14.070 MHz (the PSK frequency).

Antenna Length: 12 Meters
Number of Segments: 15
Load Segment Locations: 3, 13
Load Inductance: 24.5 uH

Next step is to see if a 24.5 uH inductor, 12/15 meters long is even practical. The next iteration will probably be to move the inductor closer to the feed point, and increase the number of segments.

Next I'll compare my design to published designs as a sanity check on the simulation. If that check out, I'll build it and measure the performance with an antenna analyzer.

Anyway, here's what the VSWR and radiation pattern look like.


Tuesday, January 7, 2020

Processing Tracks from the Columbus V1000 GPS

The Columbus V1000 is a really cool device for logging coordinates with which to geotag photos. Because it can store data in the GPX format, its files can be imported right into geotagging apps like Prune. The V1000 can also log temperature but unfortunately there's no place to in the GPX format for that. Instead temperature can be stored in a CSV file or Columbus' propriatory GPS format. However those formats can't be easily imported into the geotagging apps that I prefer.

Recently I found a solution. Adam Snodgrass wrote a slick little command line app that converts the Columbus GPS format to GPX for geotagging, and CSV for temperatures.

https://github.com/asnodgrass/columbus-v1000

To install it first install Git:

$ sudo apt-get install git-core

Then install the conversion program:

$ go get github.com/asnodgrass/columbus-v1000
$ go install github.com/asnodgrass/columbus-v1000

You can run the program by with the following command:

$ ~/go/bin/columbus-v1000 gpx -i abc.gps -o abc.gpx
$ ~/go/bin/columbus-v1000 csv -i abc.gps -o abc.csv


Sunday, October 13, 2019

Setting Linux USB for ic-7300 and fldigi

It took me a while to figure out how to set this up, so here are a few notes.

The first issue was that the user needs dialout privileges.

$ sudo usermod -a -G dialout $USER

The user may also need to get audio privileges. Check settings like this:

$ id
uid=1000(tester) gid=1000(tester) groups=1000(username),4(adm),20(dialout),24(cdrom),27(sudo),29(audio),30(dip),46(plugdev),112(lpadmin),129(sambashare)


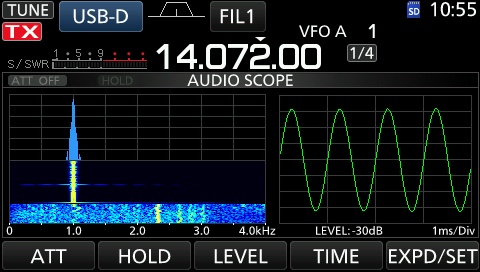
The next issue was that the old laptop I was sending a corrupted signal. Looking at the audio FFT on the 7300, I could see that the image had wide "skirts". Maybe old laptop wasn't up to the job. I found out later that fldigi has a checkbox for "slow cpu" under "misc", "cpu". That might have fixed it, but I just switched to a desktop computer and now the audio FFT now looks something this:


Sunday, July 8, 2018

Grafting Fruit Trees

I've always thought grafting was an amazing bio-hack. It seemed like an incredibly difficult task to get a branch from one tree to grow on another. It turns out it's not that hard, especially because there are a lot of resources available. If you search the web for examples, though, you'll be overwhelmed by all the different techniques. But first, where do you get cuttings to graft onto you trees. What we did was to go to a scion exchange. This is where you pay $5 for admission and can take any scions, or fruit tree cuttings, that you want to try grafting. There are also demonstrations of techniques that work for the types of trees in your area that you want to graft. After you've selected a technique, you can then search for more information and videos.

We tried both bark grafting and cleft grafting. I think the cleft graft is much easier, but it requires cutting toward yourself, so you have to be extremely careful. I used a very sharp grafting knife and put a spool around the root stock to protect my hand, but even that was very scary.

We did grafts on apples, pit fruits, pears, and citrus in two grafting sessions. A little more than half of the grafts were successful. Not bad for a first try. Apples and pit fruits were easier. Citrus trees were more difficult. Some of the fastest growing grafts were onto a volunteer nectarine tree - it must have grown from a pit I tossed into the back yard. The fruits on these tree have never been good, so it was a good candidate for grafting.

Here's a photo of the nectarine a couple of months after the graft:


And here's a photo of a Meyer lemon on Eureka lemon root stock.


Unfortunately, in many cases I can't tell you what the scion is until after we have a harvest because I tagged it with Sharpie on plastic and the weather faded it to unreadability! Scratching the name of the scion type onto an aluminum tag works much better.